LogoLogo
  • A better way to do...stuff!
  • How we build the app
    • Overview
  • Documentation
    • Draftbit
      • Using Live Preview
      • Workspaces and Billing
      • Introduction to the Builder
      • Layout
      • Intro to Navigation
      • Fetching Data
      • Direct Integrations
      • FAQs
      • Draftbit
      • Draftbit
      • Custom Blocks
      • Borders, Background, and Elevation
      • Actions
      • Custom Screen Code
      • Exporting and Publishing Your Project
      • Sharing Your Project Online
      • Publishing Your App as a PWA
      • Stack Navigator
      • Tab Navigator
      • Draftbit
      • Draftbit
      • Basic
      • Media
      • REST Services & Endpoints
      • REST API Integrations
      • Themes & Styling
      • Submitting Data
      • Draftbit
      • Draftbit
    • Xano
      • resources-and-tips-1
        • 🎞️ Xano Video Tutorials
        • 🤝Community Corner
        • 💰Share Xano. Make money
      • FAQ
      • getting-started
        • ⚡ Jumpstart
        • 🎞️ The Xano Interface
      • instances
        • What is an Instance?
        • Early Access Instance
        • Upgrading an Instance
        • Sharing
        • Bandwidth Usage
        • API Rate Limit
      • What is a Workspace?
      • Dashboard
      • Database
      • Airtable Import
      • API
      • Library
      • Marketplace
      • Settings
      • authentication
        • Authentication
        • Sign-up & Log in
      • data-manipulation
        • The Function Stack
        • Addons (GraphQL-Like)
        • The Expression Builder
        • External Query Manipulation
        • Timestamp
        • Filters
        • Images
    • Expo
      • Creating your first build - Expo Documentation
    • Kommunicate
      • Installation
      • Installation
      • Installation
      • Installation
      • Installation
      • Flutter Installation
      • Installation
      • Zapier Integration
      • Authentication
      • CMS Installation
      • Authentication
      • Conversation
      • Conversation Assignment
      • Customization
      • Localization
      • Logout
      • Web Troubleshooting
      • Installation
      • Authentication
      • Push Notification
      • Conversation
      • Customization
      • Localization
      • Logout
      • Installation
      • Authentication
      • Push Notification
      • Conversation
      • Customization
    • Formito
      • basics
        • Getting Started
        • Variables
        • Are you GDPR ready?
        • How to prefill the values of my chatbot?
      • connect
        • How to connect Formito to Zapier?
      • convert
        • How to convert old formito chatbots to the new version?
        • How to convert Google Forms into a chatbot?
        • How to convert a Monday.com board to a chatbot?
        • How to create chatbot from QuickBase table?
      • guide
        • How to add my chatbot to WordPress?
        • How to create a chatbot for Zendesk?
      • shopify
        • How to embed my chatbot into a Shopify page?
        • How to display Formito chatbot on bottom corner of my Shopify store?
        • How to open my chatbot after clicking on links or buttons?
    • Stonly
  • Flex Stuff
    • App
    • APIs
    • Database
    • Website
    • Design
    • Style Guide
  • Content
    • Guides
    • ChatBots
    • Blogs
    • Whitepapers
  • Company
    • About us
    • Brand
    • Roadmap
    • Policies
  • Flex Together
    • Overview
    • Fair Finance
Powered by GitBook
On this page

Was this helpful?

  1. Documentation
  2. Draftbit

REST Services & Endpoints

PreviousMediaNextREST API Integrations

Last updated 4 years ago

Was this helpful?

The Data tab on the left-hand side of the Builder is the central location for creating and managing APIs, Services, and Endpoints.

Here is where you can store your own REST API to be used throughout your app. Saving your API here allows you to easily re-use it throughout your app as opposed to reconfiguring requests on a screen-by-screen basis with the Fetch component.

As of now, you are able to set up a basic REST API connection. GraphQL, Airtable, Firebase and Example Data integrations will be available soon. Click the links to upvote the features on our which will notify you about the feature's progress.

To add a new service, click the Data button in the left-hand column of the builder. Click 'Rest API' under the ADD A SERVICE header. Use the configuration options below to set up your API.
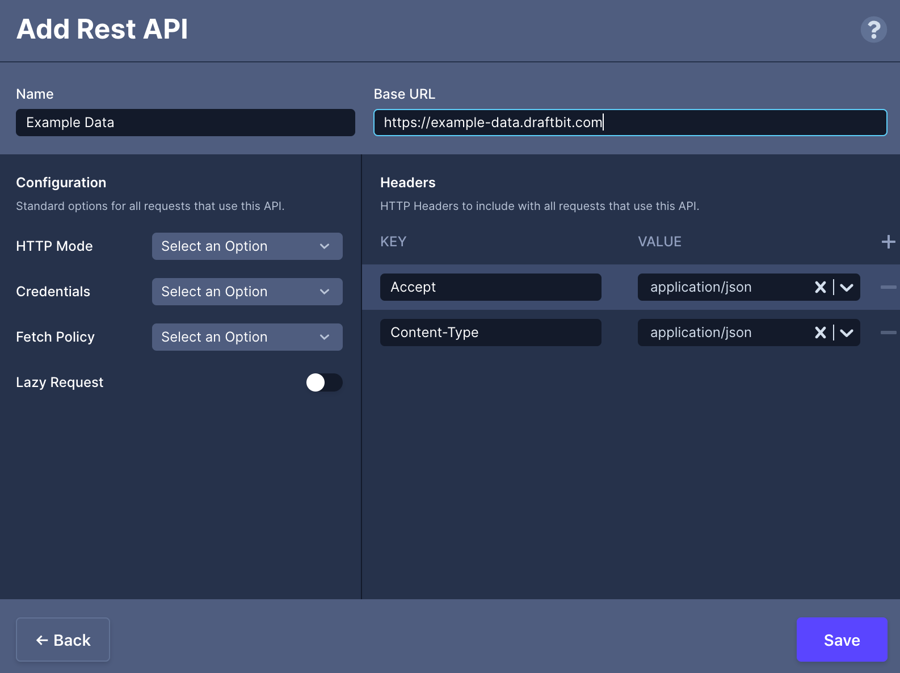
Parameter

Description

Name

The name of the Service to be displayed in the menu.

Base URL

Cannot contain /

HTTP Mode

cors: Allows cross-origin requests, for example to access various APIs offered by 3rd party vendors. no-cors: Prevents the method from being anything other than HEAD, GET or POST, and the headers from being anything other than simple headers. same-origin: If a request is made to another origin with this mode set, the result is simply an error. You could use this to ensure that a request is always being made to your origin.

Credentials

include: Always send user credentials (cookies, basic http auth, etc..), even for cross-origin calls. omit: Never send or receive cookies. same-origin: Send user credentials (cookies, basic http auth, etc..) if the URL is on the same origin as the calling script.

Fetch Policy

cache-and-network: Keeps the cache up-to-date with what is on the server. cache-first: The default. Uses quick response times for queries over getting the most up-to-date data cache-only: Avoids making any network requests. If the data you are querying is not available in the cache, it will throw an error. network-only: Shows the most up-to-date information over quick responses.

Lazy Request

Enable so that the data loads only when requested

Accept: application/json and Content-Type: application/json are the default headers in each REST API configuration. You can also add any you've saved by clicking the '+' in the top right corner, giving the Header a name, and selecting your Global Variable from the dropdown.

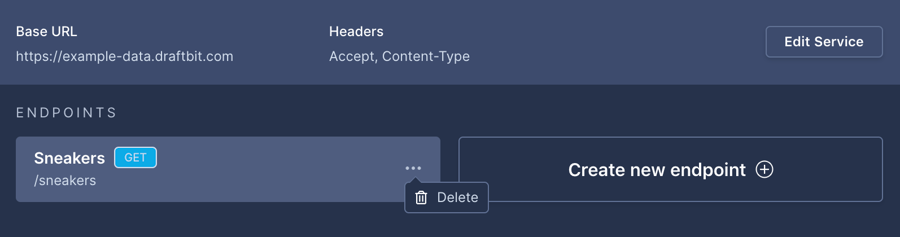
Once you've selected the Service, click the 'Edit Service' on the right of the Service's name

To delete a Service, click the three dots ("...") next to the name and click 'Delete

After you've created a new Service, you'll be prompted to add new Endpoints for your service. Configuring endpoints in this menu will allow you to easily reference and re-use endpoints throughout your app.

An API endpoint is point of entry between an API and a server. The endpoint defines what information you're accessing from your API.

To add an endpoint, simply click the 'Create new endpoint' button.

Parameter

Description

Path & Params

Click on the name of the endpoint in the ENDPOINTS section to be taken to the configuration screen.

To delete an endpoint, click the three dots ("...") next to the name and click 'Delete'

In this section, you're also able to add navigation params which are what will allow you between screens. You can create a navigation param by enclosing the variable you'd like to pass inside of double brackets ( ex. {{VARIABLE}}).

Define the path of the endpoint and/or add a navigation param for .

Updated 6 months ago

pass data
MDN Docs - Request.mode
MDN Docs - Request Credentials
Understanding Apollo Fetch Policies
Endpoint – What is an API Endpoint?
Passing parameters to routes
Table of Contents
Services
Adding a Service
Configuration
Headers
Editing a Service
Deleting a Service
Endpoints
Adding an endpoint
Configuration
Editing an endpoint
Deleting an endpoint
Passing Data
roadmap
Global Variables