LogoLogo
  • A better way to do...stuff!
  • How we build the app
    • Overview
  • Documentation
    • Draftbit
      • Using Live Preview
      • Workspaces and Billing
      • Introduction to the Builder
      • Layout
      • Intro to Navigation
      • Fetching Data
      • Direct Integrations
      • FAQs
      • Draftbit
      • Draftbit
      • Custom Blocks
      • Borders, Background, and Elevation
      • Actions
      • Custom Screen Code
      • Exporting and Publishing Your Project
      • Sharing Your Project Online
      • Publishing Your App as a PWA
      • Stack Navigator
      • Tab Navigator
      • Draftbit
      • Draftbit
      • Basic
      • Media
      • REST Services & Endpoints
      • REST API Integrations
      • Themes & Styling
      • Submitting Data
      • Draftbit
      • Draftbit
    • Xano
      • resources-and-tips-1
        • 🎞️ Xano Video Tutorials
        • 🤝Community Corner
        • 💰Share Xano. Make money
      • FAQ
      • getting-started
        • ⚡ Jumpstart
        • 🎞️ The Xano Interface
      • instances
        • What is an Instance?
        • Early Access Instance
        • Upgrading an Instance
        • Sharing
        • Bandwidth Usage
        • API Rate Limit
      • What is a Workspace?
      • Dashboard
      • Database
      • Airtable Import
      • API
      • Library
      • Marketplace
      • Settings
      • authentication
        • Authentication
        • Sign-up & Log in
      • data-manipulation
        • The Function Stack
        • Addons (GraphQL-Like)
        • The Expression Builder
        • External Query Manipulation
        • Timestamp
        • Filters
        • Images
    • Expo
      • Creating your first build - Expo Documentation
    • Kommunicate
      • Installation
      • Installation
      • Installation
      • Installation
      • Installation
      • Flutter Installation
      • Installation
      • Zapier Integration
      • Authentication
      • CMS Installation
      • Authentication
      • Conversation
      • Conversation Assignment
      • Customization
      • Localization
      • Logout
      • Web Troubleshooting
      • Installation
      • Authentication
      • Push Notification
      • Conversation
      • Customization
      • Localization
      • Logout
      • Installation
      • Authentication
      • Push Notification
      • Conversation
      • Customization
    • Formito
      • basics
        • Getting Started
        • Variables
        • Are you GDPR ready?
        • How to prefill the values of my chatbot?
      • connect
        • How to connect Formito to Zapier?
      • convert
        • How to convert old formito chatbots to the new version?
        • How to convert Google Forms into a chatbot?
        • How to convert a Monday.com board to a chatbot?
        • How to create chatbot from QuickBase table?
      • guide
        • How to add my chatbot to WordPress?
        • How to create a chatbot for Zendesk?
      • shopify
        • How to embed my chatbot into a Shopify page?
        • How to display Formito chatbot on bottom corner of my Shopify store?
        • How to open my chatbot after clicking on links or buttons?
    • Stonly
  • Flex Stuff
    • App
    • APIs
    • Database
    • Website
    • Design
    • Style Guide
  • Content
    • Guides
    • ChatBots
    • Blogs
    • Whitepapers
  • Company
    • About us
    • Brand
    • Roadmap
    • Policies
  • Flex Together
    • Overview
    • Fair Finance
Powered by GitBook
On this page
  • Overview
  • User details
  • User authentication
  • 1. Visitors
  • 2. Pre-chat lead collection
  • 3. Log in your existing users on Kommunicate
  • 4. Send user details to bot platform
  • Updating user details after the plugin is initialized

Was this helpful?

  1. Documentation
  2. Kommunicate

Authentication

PreviousCMS InstallationNextConversation

Last updated 4 years ago

Was this helpful?

Overview

In this section, you can get the instructions to authenticate the users coming to the chat. You can set how users are identified and authenticated. You can also set up lead collection forms to get information from the users before initializing the chat.

User details

You can set and update user details in kommunicateSettings function in the Kommunicate chat plugin script.

Here are the parameters you can pass in the to add the user information:

Parameters

Type

Description

userId

String

This is your user’s/visiter's ID. Kommunicate will generate a random ID if this is not defined.

userName

String

This is the display name of the user. Your team will identify the user by this display name.

email

String

Email ID of the user. If not online, the user will be notified by fallback emails sent to this email ID.

password

String

This will be User's password.

imageLink

String

This will be the profile image of the user.

conversationTitle

String

All conversations will have this title. Once the conversation is assigned to one of your team, their name would come as the conversation title.

defaultMessageMetaData

Object

This will send defaultMessageMetaData with every message

authenticationTypeId

Integer

User authentication

There are 3 ways to log in users into the chat.

1. Visitors

Whenever users come to your website, they are assigned a random ID by default. This behavior is best suited for anonymous users. Your anonymous users will be identified by pseudonyms. Our pseudonyms structure contains an adjective with a sea-creature name (For example, Jolly Shellfish). Add the below-mentioned setting to allow anonymous users into the chat:

Parameters

Description

appId

A unique application ID assigned to your Kommunicate account.

conversationTitle

All conversations will have this title. Once the conversation is assigned to one of your team members, their name would come as the conversation title.


var kommunicateSettings = {
    ...
    "appId": '',
    "conversationTitle": ''
    ...
};
 

2. Pre-chat lead collection

For collecting users' contact information before initiating the chat, use the preLeadCollection method. Once configured, users will see the form on click of the chat widget launcher icon.
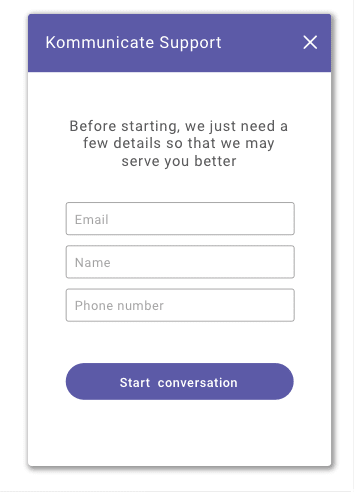
NOTE: At least one of the (name, email, phone) fields is required.

Adding custom properties in the pre-chat lead collection form

You can collect any custom information from the users as well. Just add the object for that particular information in the code. Let's say you want to collect your user's employment information, you can add that field in a similar manner.

Example:


var kommunicateSettings = {
     ...
    "preLeadCollection": [{
            "field": "Name", 
            "required": true, 
            "placeholder": "Enter your name" 
        },
        {
            "field": "Email",
            "type": "email",
            "required": true,
            "placeholder": "Enter your email"
        },
        {
            "field": "Phone",
            "type": "number",
            "required": true,
            "element": "input", 
            "placeholder": "Enter your phone number"
        },
        {
            "field": "Employer", 
            "required": true,
            "element": "input",
            "placeholder": "Enter employer name"
        }
    ]
    ...
};

3. Log in your existing users on Kommunicate

If the user has already logged into your website previously, then pass the user details to Kommunicate using the following setting:

Parameters

Description

userId

It is the unique identifier for any user, it can be anything like email, phone number or uuid from your database. Note: Spacing and set of special characters^!$%^&*() are not accepted in this parameter.

userName

Display name of the user. Your team will identify the user by this display name.

email

Email ID of logged in user.

password

Password of logged in user.

authenticationTypeId

Example:


var kommunicateSettings = {
    ...
    "userId": '',
    "email": '',
    "password": '',
    "authenticationTypeId" : 1 
    ...
};

4. Send user details to bot platform

Example:


...
"onInit": function () {
    var chatContext = {
        "userId": '',
        "email": ''
    }
    Kommunicate.updateChatContext(chatContext);
}
...

Updating user details after the plugin is initialized

Once the chat plugin is initialized and has returned success response, then you can use Kommunicate.updateUser(userdetail) method to update the user's details.

var kommunicateSettings = {
    ...
    "onInit": function () {
        
        var userdetail = {
            "email": '',
            "displayName": '',
            "imageLink": '',
            "metadata": {      
                "companyName": value1,
                "designation": value2,
                "linkedInProfile": value3
            }
        };
        Kommunicate.updateUser(userdetail);
    }
    ...
};

parameters

description

email

Email ID to be updated.

displayName

Display name of the user. Your team will identify the user by this display name.

imageLink

This will be the profile image of the user.

metadata

It is the extra information about the user. You can pass information such as the user's company name and designation. This information will be visible to your team in the Kommunicate dashboard.

You can use this to authenticate userId and password from your server and pass the value of 'authenticationTypeId' as "0" (Optional).

NOTE: APP_ID is a unique application ID assigned to your Kommunicate account. You can get it from the in Kommunicate Dashboard. Example:

Default: 1 ,you can pass 1 for password verification from Kommunicate server and 0 for access token verification from server.

User details can be sent to the bot platform by initializing a chatContext object with all the user details parameter and append it to Kommunicate settings by calling Kommunicate.updateChatContext . The right place to call this process is where you pass the onInit function in the .

plugin script
Install section
method
installation script
Set AccessToken URL
client